Showing posts with label how to. Show all posts

Thursday, December 22, 2011

Photo Cookies and Edible Frosting Sheets: A tutorial

Warning: This is a fairly dense tutorial post.  When I started doing photo cookies, I had a very hard time finding cohesive information and had to put together bits and pieces from a bunch of different sites. Hopefully this puts it all together in one spot.  Drop me a comment if I've missed something or you want more information on something, I'm more than willing to share all the hours I spent trolling the internet and talking to people to get this working!

~~~~~~~~~~~~~~~~~~~~~~~~~~~~~~~

A girlfriend of mine asked me to make her some Pokemon character cookies for her son's 6th birthday. When I looked up the characters, my jaw dropped. How was I going to ice this figure onto a cookie?!

Holy Gliscor!
And then I remembered - photo cookies, of course!

Photo cookies use printed images on edible frosting sheets, just like you would print an image on paper using a regular printer. Edible frosting sheets are basically frosting/icing pressed really thin to paper width. 

Printed sheet of edible frosting which will later become...

"Photobooth" style wedding cookie favors!


So for those that want to experiment with edible images you can do one of 2 things:

1.  Buy the printed sheets from your local bakery/supermarket
2.  Buy all the equipment and materials and do it yourself.

For option #1:
I know for sure that the A&P in Fort Lee (right by GWB, next to McD) will print out images on frosting sheets for you. I know because I've done it! They charge $10 per 8.5" x 11" sheet.  You need to bring a USB with your image ready to print.  It's pricey, but you'll see that unless you're printing a lot, it's not worth buying all the equipment and materials to do it yourself (just you wait and see when you get to option #2!). 

The only problem I had with this method though is that there's less precision and control to get the images to print exactly how you want. Jpegs seems to mutate from computer to computer so when I got it printed at A&P the actual images came out a little smaller than what I had measured them out to when I created the file in InDesign/Photoshop. So be flexible. You can go in the morning and get your images printed right then and there with a 5 minute wait. Done!

Another option for those with more time is to check out this shop on Etsy: EyeCandey.
The woman who runs that shop, Joy, was THE most pleasant person to deal with! I used her the very first time I tried photo images on cookies for my friend's then boyfriend (now husband)'s birthday.  You send the photos you want printed and she will print and send you your edible prints in the mail. Prices are comparable but you have to pay for shipping. (argh that blasted shipping!) I will say that the quality of the frosting sheet through EyeCandey was better than the one from A&P (thinner, more flexible and easier to work with in general).  Plus she also offers images you can choose from. How cute are these!


Other sites also recommend checking in with your local bakery, especially if they offer photo cakes and cookies and such themselves.  I think Minnesota bakeries must be much friendlier than those in North Bergern, NJ because the 2 bakeries I went into denied my request.  One even went off on me on how I was so brazen to come in to try to use their equipment to steal their business? .......wow. All I wanted was to make 12 cookies for a friend....

For option #2:
You'll need to go big or go home!
  • You'll need a printer. I bought (and recommend) the Canon IP3600 Inkjet.  Basically, you want a printer that will be used SOLELY with edible inks. DO NOT use an old printer that has already be used with regular (TOXIC) inks.  Let's keep it clean folks! There is no "special" printer, you can buy any old printer but I would just check to see that your particular model has corresponding inks to buy for it. It seems that Epson and Canon are the most popular and widely used brands in general (for edible printing).
Look at all the pink stains on my desk from messy ink cartridge handling! BOOOO.
  •  You'll also need edible inks and frosting sheets.  Make sure you get the right inks for your particular printer. I'm linking you to ones that compatible to the printer I bought and listed above.
Edible Ink Cartridges for the Canon IP3600 (5 cartridge set)

Frosting Sheets 8.5" x 11" size from Kopykake
 You can also check out the site for Icing Images: they have a slew of products and information regarding printing edible images. 

A couple of caveats for those that want to plunge into option #2:
  • edible inks clog fairly easily (for some reason, its always my yellow ink that gives me a problem!!!) so they recommend that you print something (anything) at least once a week (you can just use regular paper instead of wasting valuable frosting sheets!)
  • edible inks also get used up fairly quickly and they're not cheap. One solution is to buy refill inks and to refill them yourselves. You can refill your cartridges up to 3 times before you need to swap out the entire cartridges and buy new ones.
Refill inks. Make sure you buy the appropriate refills for your model ink cartridges.  Mine actually came with 4 bottles - black is not shown in this picture. 

That being said, i LOVE my edible printing system! You can make endless designs and pretty cookies relatively simply. I don't love it when it clogs on me, or jams my paper feed or just feels like doing nothing. But a few coaxing words, a refill here and a swift karate chop there and we're good to go!
Once your sheets are printed, you'll want to let them dry a little bit (I wait around 30 min to be safe) and then you can start cutting out the images to work with.  If you're not going to use them immediately, make sure you store them in an airtight container or ziploc so they don't dry out.  Frosting sheets last pretty long as long as they're store correctly so this is a good step to do in advance is time is against you.  (I believe the expiration on my package of frosting sheets is 12/2012 and I bought them in July!)
Now that you have your images, you'll want to:

1.  Outline your cookie


2.  Flood your cookie (flooding just means filling in the outline with icing)


3.  Apply your icing image on the wet icing. 
Just place your image where you want it and drop it into the wet icing. As it dries, the frosting image will magically meld together with the wet icing. Carefully smooth it down so the image touches the frosting but be careful because the image is very delicate and senstive to moisture.  If a drop of water falls on it, watch the colors run as you cry out in anguish (reminds me of the execution scene from Braveheart, 'cept you won't be screaming FREEDOM!!!!)  The image will become more and more "wet" as it merges with the moisture from the icing...if you try to move the image once the moisture sets in, the image might tear.  So try to do any manipulation within the first few seconds of application. 

4.  Let dry (at least a few hours)
This for me is the "danger' period.  For some reason, a stray cookie crumb always happens to find its way on top of a freshly iced cooke. It's like the one day you wear a white shirt - of COURSE this is the day you spill black coffee on yourself. Of course! Show restraint and DO NOT TOUCH! Wait until it dries and then flick it off with a toothpick. Handling the wet icing with photo image is never a good option. 

5.  Pipe a decorative border (or not!) of your choice. 
For the photobooth style wedding favors above, I purposely did not any additional borders to give it that photograph look. You have to be really careful about application of the photo if you choose not to do a border.  Most times a border is preferable - it adds a little oomph AND it covers up a not so even edge.

Variety of "picture frame" style borders. The one on the right has no border at all!


Classic "dot" border. Also shows you don't have to use photographs...can use any kind of image. Anything you can print you can eat!
Line border with accent sugar pearls

"Double dots" wide border
There were the first ever photo cookies I did! I ordered the sheets from the Etsy link mentioned above. I actually thought the photos would come out much larger. Lemons --> Lemonade! Made the difference into the design.


Simple piped line border
Go crazy! Play with different piping tips. This was the first time I tried the star shaped tip - make sure your icing is fairly thick so it can hold it's shape!

6.  Let dry COMPLETELY. 
If you don't let the image dry completely, it will stick to the packaging and fall apart. I've had cookies dry for the full 24 hours but still seem to stick later in packaging. Not sure why so give yourself plenty of time.

Voila!
So do you want to see how those Pokemon cookies turned out?


From left to right, top to bottom:  Pikachu, Azelf, Mesprit, Uxie, Gliscor, Snivy.
Yup. I know the names of the Pokemon characters now. I am not proud.

Pikachu! I see you! (omg, so cheesy I just barfed a little!)


Wednesday, November 23, 2011

Turkey Cookies: A Visual How-To


Icing colors ready to go. Love Fall!

You'll see in the end I changed the face a little. Always feel free to change your mind, especially if you start thinking your turkey looks like he has a bloody nose. 

Tracing my sketch onto a transparency sheet
Don't forget to do detail work while your icing is still wet.  Sorry, about the red dye on my finger.

Alternate feathers so they don't merge into one another

Let Dry 24 hours. Really. You'll be sorry if you don't!


CAREFULLY peel back the sheet from the icing

Tada!

Time to ice your cookie. Pipe your outline.

Flood your cookie

Totally gratuitous shot of the backside: look at all those trapped air bubbles!

Gently place royal icing turkey onto cookie

You can fine tune the placement but only just a little. Wiggle the cookie to set/smooth the icing

Let these dry overnight

Add beak, feet and gobbler (the floppy turkey neck thing)

Smile and say "turkeeeeeeee"

Boxed and ready

Turkey Casualty
The only turkey not to make it, he was accidentally smashed by my left elbow while trying to do too many things at the same time. 


Tuesday, November 22, 2011

Royal Icing 101: A tutorial

Alrighty folks! Now we get to the fun part of cookies, the decorating! Every artist needs a medium: the sugar cookie is my canvas, and royal icing is my paint!


It's simple, versatile, and pretty forgiving. I've done a lot of research and you can find a gajillion receipes for royal icing --> they're pretty much all the same with minor tweaks. Like 1/4 tsp of almond extract as opposed to 1/2 tsp.  Psssht. I give kudos for all the anal bakers who like to test batch after batch with minor tweaks to find the perfect recipe. Cuz if it weren't for you, who would I steal from?  JK.  I appreciate all your hard work.

I'm reminded of my college days....a fellow math major and I would do problem sets weeeee into the night.  Obviously since we're doing it together, we would hand in the same solutions. But I always scored slightly higher than her. We think it was due to penmanship and neatness. Hers always had ramen and soup stains on her problem sets as she worked diligently while eating.  Mine were neat and legible since I was waiting for her to finish so I could copy. Hee hee. I hope she's not reading this.

Anyways, back to cookies. Actually I did try a few and honestly I didn't taste any major differences. I think with royal icing its just about making sure to add enough flavoring otherwise you're basically eating sugar and water which isn't very flavorful (though it is very sweet and again I'm reminded of another gf who likes to eat Peeps, fondant and royal icing - without the cookie/cake - I have lots of weird friends).  I used to describe my cookies as bimbo cookies - pretty to look at but perhaps not much substance. Hopefully that's not the case anymore and they're as good to eat as look at.

So let's start with the basic recipe. I add the suffix "101" because obviously this is just the beginning! We haven't even started on the decorating but need to start with the basics right?

I'm still learning new tricks and I'm trying (oh so hard) to document as much as I can with pictures. But sometimes the battery dies. Or I forget to take off the lens cap (omg, it's a horrible horrible feeling to open up a folder of black pictures). Or I'm already late to a birthday dinner and making my ride tie ribbons for me so I feel bad taking more time to take pictures. The list goes on. But this blog IS making me feel more accountable (<-- I had to look up the spelling of that word in the dictionary...!) so I'm being more diligent with the photo snapping.  Except for this tutorial. I'll rememer to take the lens cap off next time. Anyways, this is not that hard but I will update again with photos.

Btw, I updated my cake pop tutorial with new photos for step 5A. See? I do get things done eventually.


ROYAL ICING
2 lbs (or 8 cups) of 10x confectioner's sugar
6 tablespoons of meringue powder, slightly heaping
1/2 cup warm water
1 - 2 tsps of flavoring/extract

Confectioner's sugar = powdered sugar.  You can usually buy it in a 2 lb bag which makes it easy since you don't need to even measure it out, just dump the entire bag into the mixer.

Oh, did I mention - you need a mixer.  I suppose you can use a hand mixer but that's a long time you'll be standing there.  On the upside, I'm pretty sure you'll get diesel if you use a hand mixer.  I have noticed that my arms are slightly more toned from rolling out cookie dough. I can only imagine how ripped I'd be if used a hand mixer as well.

By slightly heaping, I mean just eyeball it so it might be a little more than an actual tablespoon measurement. Because if you're a serious baker, you know that when recipes give measurements, you're supposed to be pretty exact - ie level off the top of the measuring spoon/cup with a flat edge to have it be concise. You've been doing that right?! But for this you don't need to.

My flavoring of choice is usually almond extract.  For Christmas I was going to test peppermint. Yum! Make sure you use any flavoring that does NOT HAVE ANY OILS in it.  Oil and water do not mix. Remember that old chemistry lesson? You can shake it all you want but they will eventually separate out.  Regular vanilla, lemon or almond extract that you buy at the supermarket is ok.  But note: you should try to buy clear extract made for icing decorating otherwise your icing will be slightly tinted from the color. If you're not making white icing I suppose its ok since you'll cover it up with food coloring. But if you're looking for a crips white, make sure you get clear flavors. They sell it at Michael's and Chef Central (my favorite is online at Lorann Oils but only if I'm buying a lot because paying for shipping is a pet peeve of mine). 

Make sure your water is warm. I won't even go into temperature and solubility here...actually I can't resist - it's a direct relationship!

1.  Throw sugar and meringue powder into mixing bowl. Turn on mixer.

2.  Add flavoring to your warm water and then pour this slowly into your dry mixture

3.  Mix on low to medium speed for 8 - 12 minutes.

That's it!  In the beginning your icing will look a gooey and ivory in color.  After about 8 minutes though you'll see it fluff up, lose its shine and turn bright white.  If it looks a little TOO stiff (ie your mixer starts making noise or starts moving across the counter) then add a little bit more water, a teaspoon at a time. When you lift the icing up, it should stay up in a peak (and not fall back in) - it's that stiff.  This is your base icing. 


After ~2 minute: icing is a pale ivory in color and gooey looking


After ~4 minutes: icing is starting to thick


After ~6 minutes: Icing becomes noticeably whiter, thickening and growing in volume.
(I noticed the switch from the ivory paste to white frosting somewhere between minute 4 and 5 but don't hold fast to these time markers)


After ~8 minutes: Icing continues to whiten/thicken/increase in volume.


Done! When you lift the beater up, the icing stays on the beater. This is just your base icing. From this point you will have to add water to achieve the consistency you want/need for icing. I like to store icing at this consistency if I am not going to use it imeediately since the water tends to separate over time but I've never seen it happen at this level.

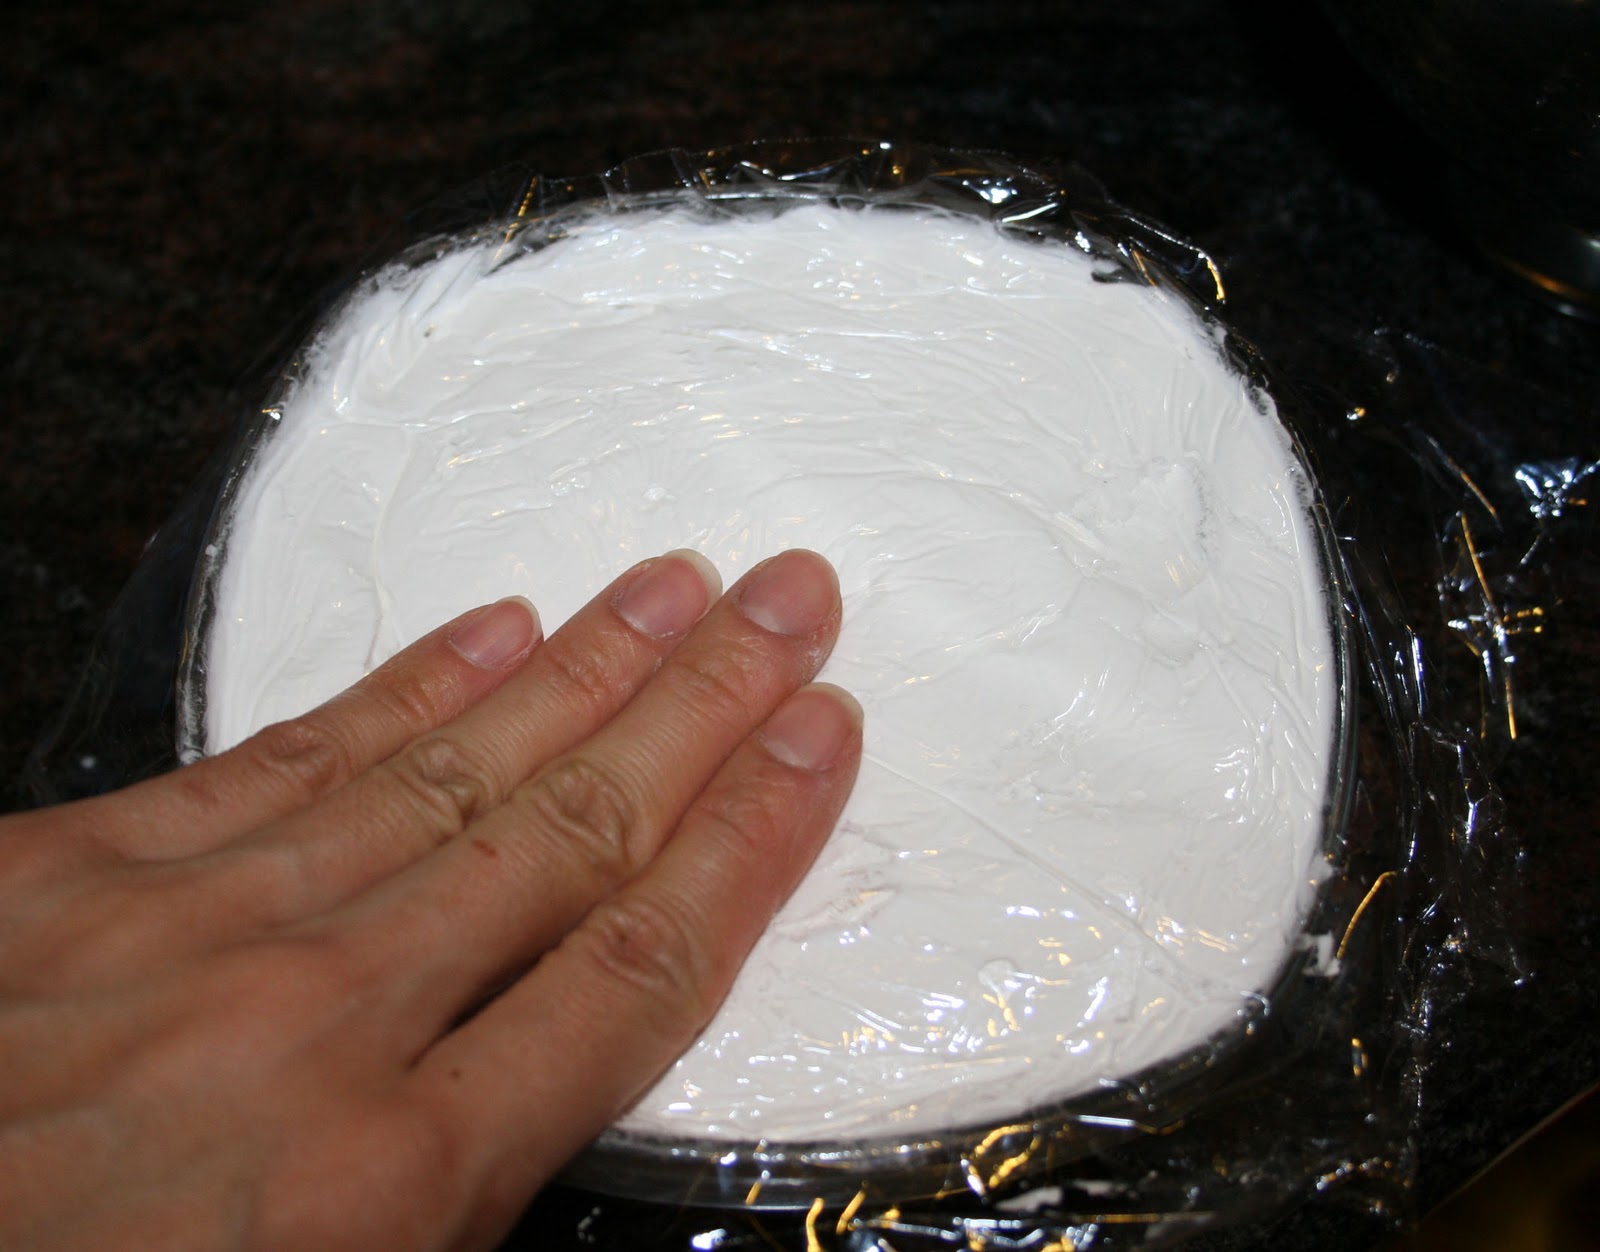
The recipe makes a pretty large batch. Should be able to ice about 4 dozen cookies.  You can portion it up into tupperware and put in the fridge. Remember to add a layer of saran wrap touching the icing so that it doesn't dry out.

Cover the icing with a layer of saran wrap before covering with the lid. Press down on the saran wrap so that its touching the icing (so air can't get in and dry it out)
Not enough icing to completely fill the tupperware? No problem. Just make sure you push down on the saran wrap layer so its making full contact with the surface of the icing
Add caption
Packed and ready for storage!
I believe it keeps in the fridge for up to a month? Never had it last that long. You can even just throw in the whole mixing bowl into the fridge if you're too lazy to transfer it into tupperware but cover it with a WET paper towel on top and then cover with saran wrap or even a plate.  The key is not to let it dry out. Once it does, you gotta chuck it. Although, I've recently been seeing blogs on where they salvage dry icing with a spray bottle. I'll report back once I confirm it works...

So there's your icing.
I'm pretty sure you'll want to dive right into decorating but hopefully I'm not your only cookie resource right now because...I'm tired. Writing coherent thoughts drains me. So decorating will have to be covered in RI 102.  Until next time.... (please cover your icing so it doesn't dry out until the next post...)


Thursday, November 17, 2011

Basic Cake Pops: A tutorial

My first attempt at cake pops (and cookies too!) was for a girlfriend's bridal shower. I really wanted to do a pretty dessert table and it was imperative that I have cute decorated cookies and cake pops to match.  Sometimes naivete and ignorance work in your favor because after weeks of research (blogs, discussion boards, youtube tutorials), planning (this was my discovery of Michael's and the beginning of my obsession with coupons) and preparation (I tested a batch of cookies on my discipleship class..."Pastor Danny" turned into a rectangular blob on a circle cookie) - had I known the frustration I was going to feel the night before the shower, I probably would have chucked it all and shelled out the money to just buy the dang treats from someone else.  The pressure from having to deliver on goods promised though had me trudge forward through failed cake pop after cake pop and since then I've had much more success. So hopefully you guys will give this a try! (The intention of this intro paragraph was supposed to be encouraging...but I get the feeling it didn't come off that way - the consequences of a math major and not having to use words to express myself in years).
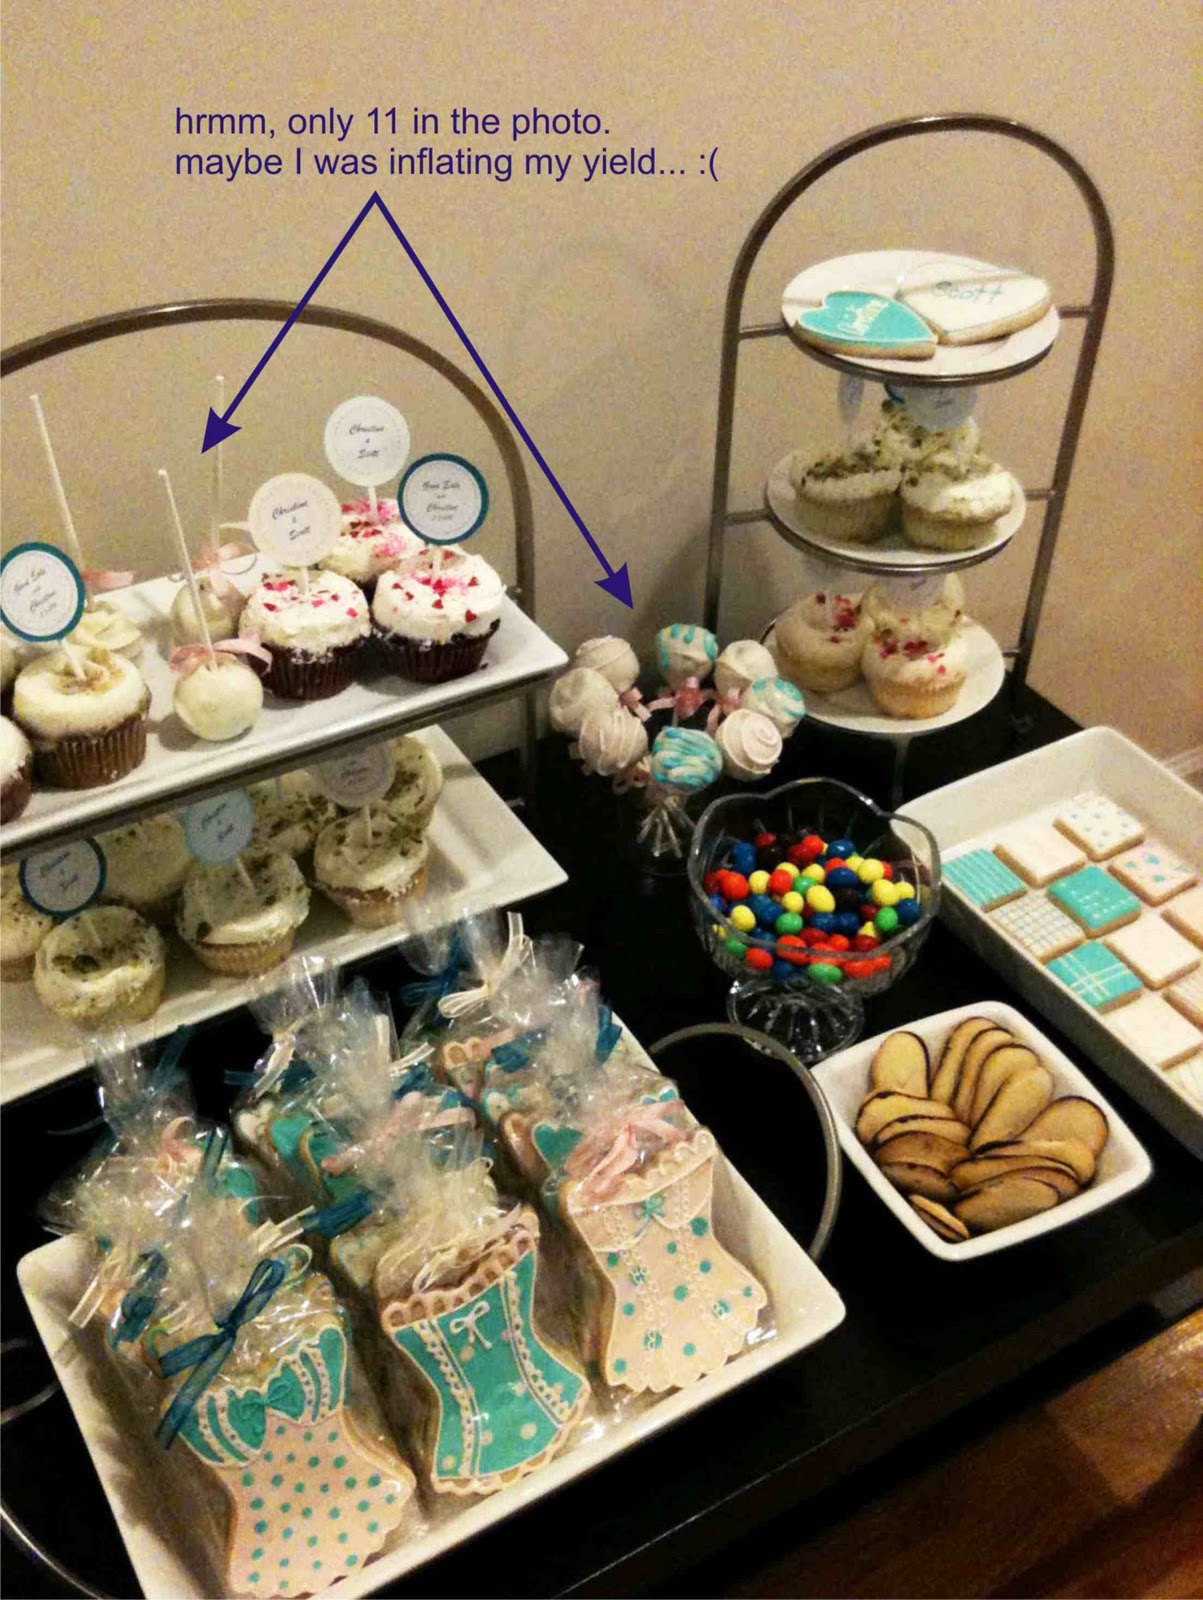
If it makes you feel better, my first batch of cake pops yielded 14 presentable cake pops at the shower (theoretical yield is 40 cake pops/batch giving me a percentage yield of 35% - in this were a chemical experiment, my first yield would be objectively categorized as poor).


It's ok. Just pretend like you only PLANNED on making 10. Now you're the hero who made extra. 


BASIC CAKE POP TUTORIAL
Yields 35 - 40 cake pops

1 baked cake
3/4 - 1 cup frosting
Candy Melts
Lollipop Sticks
Styrofoam blocks

Some personal comments:
  • To save time, you can just bake a box cake mix. It's all going to get mashed up anyways so this part is entirely up to you. You can bake it as 1 cake or as 48 cupcakes. Be as masochistic as you like. I prefer to bake my cake in a deep 9" pan so that there's a higher inside cake to outside cake ratio (do you know what i mean? if you make the cake bigger and flatter there's more surface area ie. outside cake parts. This is totally a personal preference and I also like to add nerdy references if at all possible). 
  • If you're buying store bought frosting, you're going to use about 1/2 the can (more on this later). The above measurement is if you're making homemade frosting
  • If you use Wilton's candy melts, you're going to need 2 bags per batch of cake pops.
  • I have been using 4" lollipop sticks these days but only because I found a site online where I bought it bulk for really cheap.  (Uhm...so here's where I confess to you that by bulk I mean I bought 12,000 sticks. Feel free to e-mail me if you want to buy some off of me...I think I went a little overboard). I've used 6" sticks in the past and it's the same thing.
  • Styrofoam blocks work best and you can re-use them over and over but if you don't have them you can always use mugs/cups in a pinch. Just make sure that they're short enough that the cake pop won't touch the sides of the glass but not too short or the bobble headed cake pops fall over from the weight. Otherwise you'll just end up standing in the middle of your kitchen waving cake pops in either hand until they dry....true story.
1.  Mash up your baked cake and 3/4 cup (or 1/3 container) of frosting in a large bowl with your (gloved) hands.
I've tried to use a spatula and be dainty about it. But nothing gets it all mixed and mashed and incorporated as rolling up your sleeves and just getting your hands dirty (metaphorically - please use gloves as other people will be eating this!) Really mix in the icing well.  I would start with the 3/4 cup (or 1/3 container) and then add as needed. I find it gets too sweet with too much icing plus you'll be covering them in candy melts later.  You want just enough to bind the cake together to form balls. Too much and the mixture gets very soft and hard to handle.  Too little and the balls don't really roll well and you end up with lumpy parts that look ugly when dipped.  You can always test a few out and see what you like before you roll the rest.

Those little blue and red spots are rainbow chocolate chips. Just so you don't get freaked out.

 2.  Roll the mixture into ~1" sized balls and place on a cookie sheet lined with wax/parchment paper. 
I used a tablespoon to scoop out mixture and make sure that all the balls are relatively even in size. Depending on how accurate I am is what affects my theoretical yield from 35 to 40 (not including the failed attempts in later steps).


3.  Place the cookie sheet into the fridge for an hour to firm up.
A lot of sites recommend covering the batch up with a sheet of saran wrap...I haven't found any issues without doing this but I think its because I only leave it in the fridge for an hour. If you're crunched on time you can leave these cake balls in the fridge even overnight until you're ready to coat in the candy melts - in which case, then yes I'd cover them up to keep them from drying out.

4.  Remove cake balls from the fridge. While they are thawing, heat your candy melts in the microwave (follow the directions on the back of the bag).
BE CAREFUL NOT TO OVERHEAT YOUR CANDY MELTS.  They're really sensitive and most people are prone to just melting the crap out of them.  Microwave them in 30 sec (or less) increments and then take it out and stir. You'll find that they keep melting even out of the microwave. (Shall I bring up le Chatelier's principle? for some reason this theory has been applicable a lot lately but the usual response from my friends is "omg..." so i'll stop here).  You don't want the candly melts to be super hot. Just warm enough to melt.  If the candy melts are overheated, they "seize" - literally like a candy tantrum they just kinda shut down and start getting thick and weird. So be careful at this step. 
Also, while you're melting the candy, you want your cake balls to sorta thaw a little. You want them chilled but if they're too cold, the temperature difference between the cake balls and candy melts is too high so you ended up with cracks in your candy coating (Geeks: minimize your delta!)


*Note: if you want to add sprinkles, get them ready now as you have to do it while the candy is still wet

5.  Dip your lollipop sticks into the candy melt and then insert into a cake ball. Place back on cookie sheet to set (candy melt to harden)
This adheres the stick to the cake ball. This is the standard way of affixing the stick to the cake ball. HOWEVER, I don't think this method is all that secure and I've had many a cake ball fall off the stick in the next step. I have my own preferred method - see step 5A). I have a picture of this step though for reference because I only figured out a new (foolproof!) method very recently.


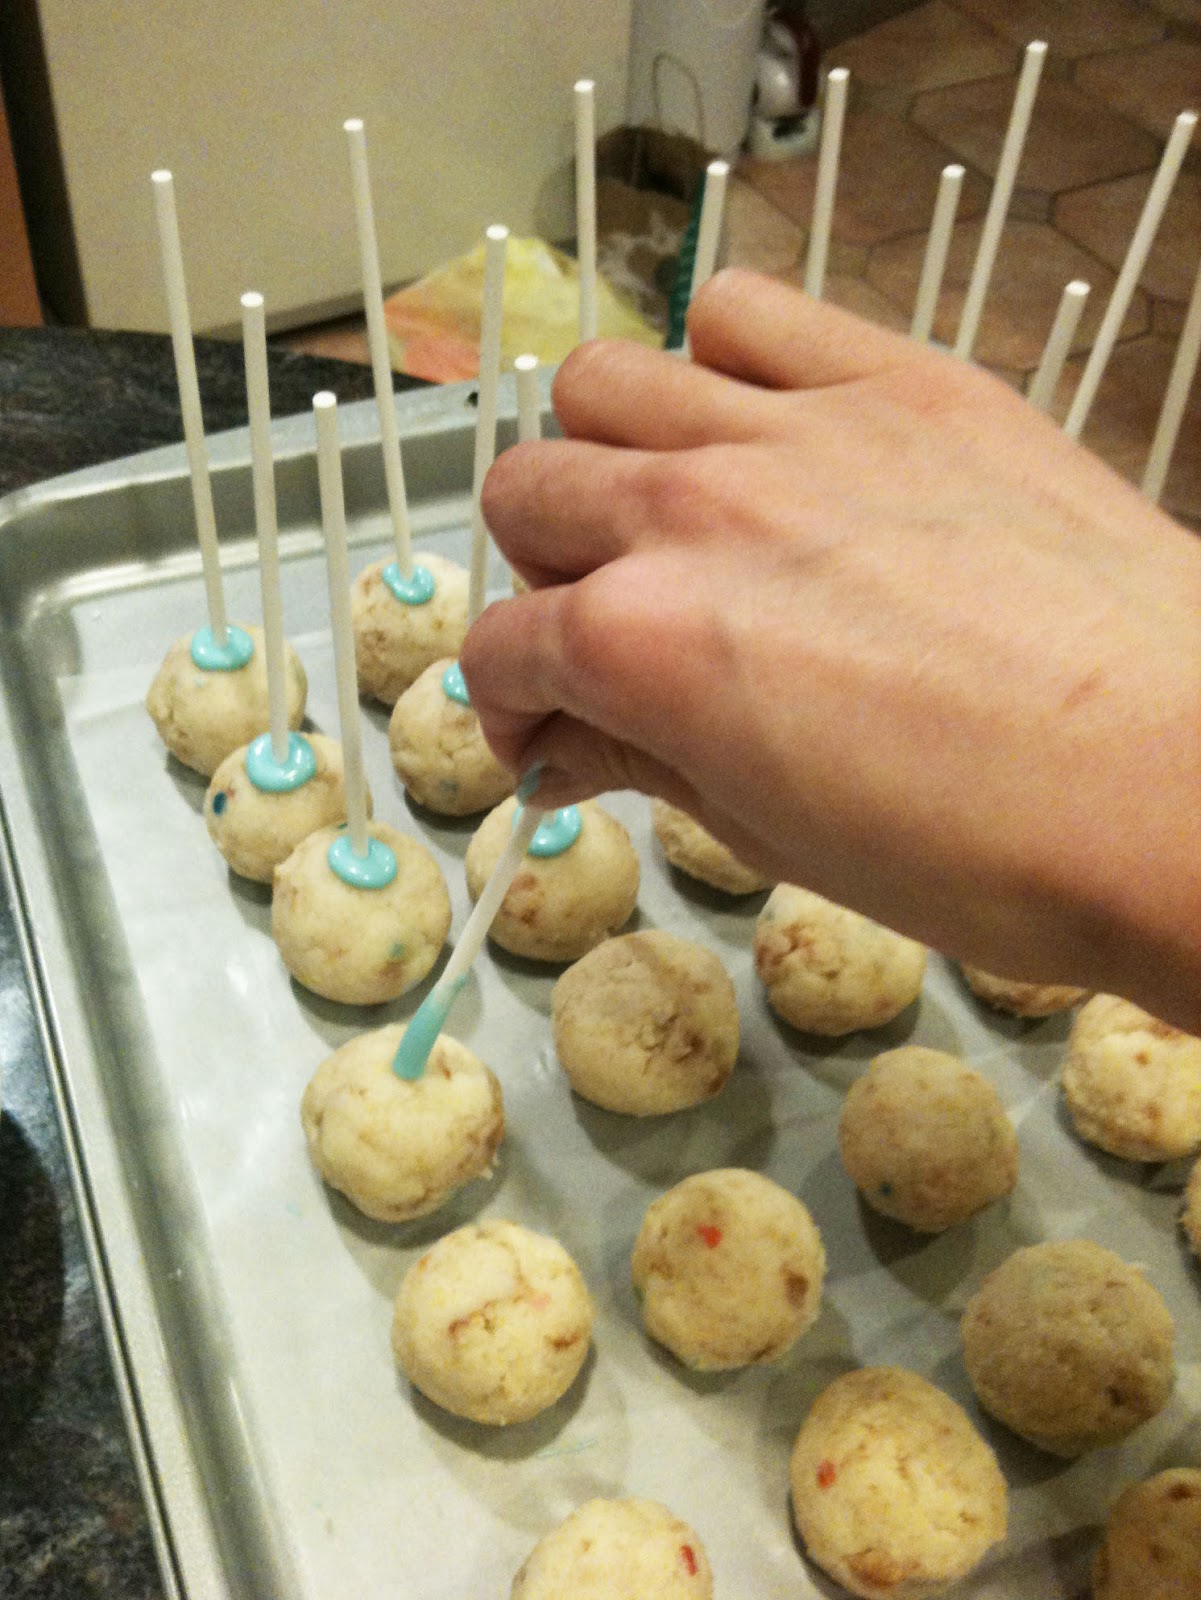
5A. Dip a the cake ball (just a little!) into the candy melt and then insert the stick into the dipped part. Place back on cookie sheet to set.
So it's a subtle difference: as opposed to dipping the STICK and inserting it into the cake ball, I dip the CAKE BALL and then insert the stick.  Perhaps it's psychological. But since this minor adjustment my yield has increased and kept steady.  Actually, for the batch below, I rolled out 36 cake balls and I yielded 36 cake pops. 100%!!!!! I am cake pop genius. (I also prayed before I started and went very slow. PTL). Sorry for picture #2, it's supposed to show me inserting the stick into the dipped cake ball but since I was using 2 hands, I had my mom take the photo. By the time I discovered that she took a bad angle, the battery died. It's a nice shot of my aging hand. I'm gonna leave it up as a reminder to use hand cream. True age is revealed through your hands and your neck ladies!!


6.  Starting from the same cake pop you started with, carefully dip the cake pop into the candy melt, rotating slowly to cover the entire cake ball.  Once covered, gently rotate and tap off the excess.  Don't tap too hard or the cake ball will fall off.  If adding sprinkles, do it now.  Set aside in styrofoam to dry and repeat with next cake pop. 
I definitely need to add a picture here.  This is the step that makes or breaks my mood with cake pops. You need only live within 5 miles of me to hear me wailing when a cake pop falls into my candy melt. The worst is when you're dealing with red velvet or chocolate cake and white candy melts. It is not a pretty sight.  The only advice I can give is to check your candy melt consistency vigilently before each dip to make sure its still smooth and melted. You might need to reheat (just a little, 10 -15 secs?) to get it back to where you want it. Always let the candy melts rest just a little before dipping anything into it.  You'll see what I mean by "seizing" when you see what happend when you dip a cold cake ball into hot candy - I will definitely remember to post a picture.  Be careful when tapping off the excess and make sure it's not still dripping before you place it in the styrofoam (otherwise it keeps dripping all over).  The best method to speed up the setting process is to swirl the cake pop in your hand in a counterclockwise direction with your arm. Really get into it.  JK. (but I really did do this the first time when I had no styrofoam and honestly? It works).

It doesn't take too long for the candy melts to finally set. By the time you're finishing up the last of them, the first few are probably dry.  Once they're all dry, you can pack them up in cello bags or in tupperware.  I like to deliver/serve them within the next day or two.  You can keep them in the fridge for up to a week, in the freeze for up to a month (after all, the cake is already baked!).  However, if you're going to freeze them, let them defrost completely before opening up the tupperware so the don't sweat too much. (Sweat = condensation). 

Get creative! the "sprinkles" on top are actualy Pop Rocks (strawberry!) for a Mad Scientist birthday party. DANGER!
Do you like my french manicure? I must have been in a wedding near the time this picture was taken.


Troubleshooting:
  • You might notice that some of the cake pops seem to "crack" after the candy is set. This is usually due to the fact that the cake pops were too cold and/or the candy melts were too hot.  As the cake pops come down to room temperature they expand and crack open in any of the thinner spots of the candy coating.  You can re-dip them in another coating but this only works if you haven't done any sprinkles or decorating yet.  I also noticed this happening a LOT (omg, like having major meltdowns a LOT) in the summertime when it's uber humid.  My solution was to pump up the A/C and to run the cake pop into a styrofoam I had sitting in the fridge for EACH cake pop. This helped set the candy quickly and I think I lost some weight.
  • You might notice some oil leaking out of the cake pops here and there.  This is any fat (from icing or cake) that leaks out of any weak points in the candy melt.  Air bubbles form in the candy melts with over mixing so try to minimize mixing AND pop any air bubbles you may notice in the candy coating with a toothpick while the candy melts are still wet (before they harden).
  • You might notice that the sticks start turning yellow - again this is from fat or oils from the cake that leech down into the stick. It doesn't mean anything is wrong but it IS rather unsightly. I have not yet found any solution to avoid this but I noticed that it happens a lot less since I've minimized how much icing I use.
  • I melt my candy melts in a large coffee mug. Last night I tried using a mini crock pot thinking it would keep my chocolates consistently melted but WRONG! My chocolate seized! The chocolates got too hot. So I think I can use it but will have to pull the plug here and there since I don't have a temperature control on it. Last night was a major FAIL.  Thank goodness I was just playing around and not doing it for a real event!
  • If you find your candy melts too thick, you can thin it out with vegetable oil or shortening. Just add a little at a time and it should liquify your consistency (about a tablespoon per pound/bag)
  • You can color your candy melts in several ways: If you're lucky, the color you want already exists as candy melts are usually sold in a variety of colors. If not, you can mix candy melt colors like you would paint: red + blue = purple, red + yellow = orange, etc.  You can also use color dyes specifically made for candy melts but to be honest? I have not had a huge success with this method yet. Plus you need an awful lot of dye to get your desired color and it just felt weird.  Let me know if you have tips on this for me!

I think that's enough. It's Thursday and I'm tired and this blogging is awfully time consuming! Especially when you're trying to sound informative and coherent.  But I still consider myself a newbie so feel free to make suggestions and give me tips!

For those that want to check out the cake pop QUEEN click here.

Good luck!