is to have this song on repeat. It makes me so, so happy...probably the best Christmas song EVER.
And if it could get any better, Mariah recorded a duet of this song with JUSTIN BIEBER.

Wednesday, November 30, 2011
Monday, November 28, 2011
"Give a girl the right shoes...
...and she can conquer the world." - Marilyn Monroe
I could conquer the world if I owned all these shoes. Though admittedly, I probably wouldn't be able to walk very far.
My personal "best of" pick from the Net-A-Porter shoe sale going on right now. Feel free to buy me any if you'd like. I thought that putting this collage together would distract me from actually buying any...we'll see what happens. (Anyone that knows me knows that I have a major weakness for shoes. I suppose most girls do...but I'd take a shoe over a handbag any day of the week).
Btw. Is it crazy that I knew each shoe's designer by memory when I was typing in the credits in the caption below? I wish I had this kind of sponge knowledge in college. Weird how I can remember who makes a shoe (sometimes by season) but yet I can't seem to remember where I put my car keys EVER.
If you buy any of these, can you take a picture and send it to me? So I can live vicariously...
 |
| 1 Camilla Skovgaard 2 Versace 3 Chloe 4 Burberry 5 Giuseppe Zanotti 6 Isabel Marant 7 Alexander McQueen 8 Giuseppe Zanotti 9 Brian Atwood 10 Stella McCartney 11 YSL All available now on sale at www.net-a-porter.com (No judgement on prices...I'm only looking)
Btw. Stila is having a huge warehouse sale online here
You can get foundation for $6! A (cheaper) alternative to curb all this Black Friday/Cyber Monday in your face sales....
|
That is one UG-LY chick...
I bet you think I'm referring to an ugly girl. Messed! But I'm literally referring to a chick. Or rather, cake pop chicks:
Laugh. How cute is that? Personally, I never understood how a simple black bar over the eyes concealed one's identity. For example:

Even with the black bar over my eyes, you can still tell it's me right? That's what I'm saying. Stupid.
Anyways. Enough silliness. Last week, Angi (of Meli & Angi and Angi & Co.) asked me if I could make duck cake pops for an event she was working on. I immediately said, sure! why not? Ducks are pretty straight forward right?
Except each time I tried to make a duck, it came out a chick.
First, as a standard, here's a pic of my traditional "chick" cake pops:


You'll notice I forgot to add his arms. I felt so bad that I made him a friend to keep him company:
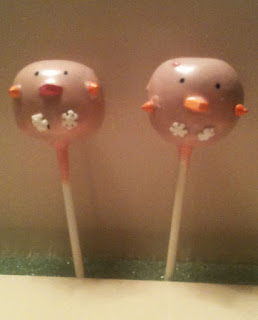
A little extra candy dripped onto the fella on the right. Smack on his shiny bald head. Better than the dirt (cake flake) that got wedged between the toes of the fella on the left I suppose. But I still felt like they looked too chick-y, not enough duck-y, so I decided to double the beaks:

Better, right? He looks like a happy fella. Blissfully ignorant of the fact that I accidentally swiped his side with my finger and dug out a chunk of his left abdomen....It was just one of those nights that did not go smoothly....thank GOODNESS these were not for a real event but just practice trials.
Then, a lightbulb went off, what if I flip the triangle beaks so the wide part is outside, kinda like a real duck bill?

And the lightbulb went out and it went dark. These do not look like ducks. They look like platypus (platypuses? platypi? what's the plural? argh. the frustration from the night is carrying over into this blog!). And see what a difference eye placement makes when you compare platypus on the left versus platypus on the right. Is it just me or does the one on the right remind you of Nicholas Cage? Also, can't tell if you notice, but there's a crack running down the front of platypus left's face. Scarface.
Maybe it's the feet? Keeping them from fully realizing their duckiness. So I changed those out to giant circle sprinkles. Which turned out cute! Like he was weaing orthpedic shoes. But after I made him, he fell back into the pot of candy melts and looked like the Joker from Batman. The Heath Ledger version. So at this point I got so frustrated, I just smashed him against the baking sheet...and then ate him to hide the evidence. Sorry, no picture.
I'm not really that violent. But sometimes you just gotta let it out on an innocent cake pop so you can regain your sane marbles. Luckily I was just playing around this night with extras so it wasn't really a big deal.
All the ugly chickees and wannabe duckies together:

They look so mischievious right?
I'm hoping Angi got a picture of the final product at the actual party. Because I forgot...
But you'll be happy to know that the actual production of the real duck pops went very smoothly. In fact, it was a 100% yield and 100% success rate! :)
Hopefully this post is encouraging to newbie cake pop makers who encounter a frustrating night. You'd think after all the cake pops I've made by now the process would be easy peasy. No matter, even ugly cake pops are delicious. No one seems to turn away an ugly chick. At least if it's a cake pop.
=O
ADDENDUM (12/16)
Here's a picture of the final product!

 |
| Identities have been concealed for emotional security purposes |

Even with the black bar over my eyes, you can still tell it's me right? That's what I'm saying. Stupid.
Anyways. Enough silliness. Last week, Angi (of Meli & Angi and Angi & Co.) asked me if I could make duck cake pops for an event she was working on. I immediately said, sure! why not? Ducks are pretty straight forward right?
Except each time I tried to make a duck, it came out a chick.
First, as a standard, here's a pic of my traditional "chick" cake pops:

To make that more duck-like, I changed the nose to a larger triangular candy piece to be the "bill":


A little extra candy dripped onto the fella on the right. Smack on his shiny bald head. Better than the dirt (cake flake) that got wedged between the toes of the fella on the left I suppose. But I still felt like they looked too chick-y, not enough duck-y, so I decided to double the beaks:

Better, right? He looks like a happy fella. Blissfully ignorant of the fact that I accidentally swiped his side with my finger and dug out a chunk of his left abdomen....It was just one of those nights that did not go smoothly....thank GOODNESS these were not for a real event but just practice trials.
Then, a lightbulb went off, what if I flip the triangle beaks so the wide part is outside, kinda like a real duck bill?

And the lightbulb went out and it went dark. These do not look like ducks. They look like platypus (platypuses? platypi? what's the plural? argh. the frustration from the night is carrying over into this blog!). And see what a difference eye placement makes when you compare platypus on the left versus platypus on the right. Is it just me or does the one on the right remind you of Nicholas Cage? Also, can't tell if you notice, but there's a crack running down the front of platypus left's face. Scarface.
Maybe it's the feet? Keeping them from fully realizing their duckiness. So I changed those out to giant circle sprinkles. Which turned out cute! Like he was weaing orthpedic shoes. But after I made him, he fell back into the pot of candy melts and looked like the Joker from Batman. The Heath Ledger version. So at this point I got so frustrated, I just smashed him against the baking sheet...and then ate him to hide the evidence. Sorry, no picture.
I'm not really that violent. But sometimes you just gotta let it out on an innocent cake pop so you can regain your sane marbles. Luckily I was just playing around this night with extras so it wasn't really a big deal.
All the ugly chickees and wannabe duckies together:

They look so mischievious right?
I'm hoping Angi got a picture of the final product at the actual party. Because I forgot...
But you'll be happy to know that the actual production of the real duck pops went very smoothly. In fact, it was a 100% yield and 100% success rate! :)
Hopefully this post is encouraging to newbie cake pop makers who encounter a frustrating night. You'd think after all the cake pops I've made by now the process would be easy peasy. No matter, even ugly cake pops are delicious. No one seems to turn away an ugly chick. At least if it's a cake pop.
=O
ADDENDUM (12/16)
Here's a picture of the final product!

Friday, November 25, 2011
Fashion Friday: Simple Winterizing
I came across this photo first:
 |
| www.hanneli.com |
Very simple outfit (skinny jeans + silk blouse + turtleneck) in not so simple colors. What an un-geeky way to pull off a white turtleneck! The only time I've worn a white turtleneck was as a layering piece while snowboarding.
Then I came across this photo:
 |
| www.hanneli.com |
I'm always impressed when the same item goes double duty in different outfits and this one spans calendarial seasons! (I have no idea where 'calendarial' popped out from - must be the NyQuil delving into untapped parts of my brain). Love. Definitely going to have to pull out all my boarding gear and see if I can turn functional into fashionable.Wednesday, November 23, 2011
Turkey Cookies: A Visual How-To
 |
| Icing colors ready to go. Love Fall! |
 |
| You'll see in the end I changed the face a little. Always feel free to change your mind, especially if you start thinking your turkey looks like he has a bloody nose. |
 |
| Tracing my sketch onto a transparency sheet |
 |
| Don't forget to do detail work while your icing is still wet. Sorry, about the red dye on my finger. |
 |
| Alternate feathers so they don't merge into one another |
 |
| Let Dry 24 hours. Really. You'll be sorry if you don't! |
 |
| CAREFULLY peel back the sheet from the icing |
 |
| Tada! |
 |
| Time to ice your cookie. Pipe your outline. |
 |
| Flood your cookie |
 |
| Totally gratuitous shot of the backside: look at all those trapped air bubbles! |
 |
| Gently place royal icing turkey onto cookie |
 |
| You can fine tune the placement but only just a little. Wiggle the cookie to set/smooth the icing |
 |
| Let these dry overnight |
 |
| Add beak, feet and gobbler (the floppy turkey neck thing) |
 |
| Smile and say "turkeeeeeeee" |
 |
| Boxed and ready |
 |
| Turkey Casualty The only turkey not to make it, he was accidentally smashed by my left elbow while trying to do too many things at the same time. |
Want, Need - Same thing
The weather's been very erratic this year. We had a snowstorm in October that knocked out power for days in some parts, but a gloriously sunny Sunday this past week that had me leaving my coat in the car. While it's still fairly chilly most days, it's not been consistent enough to make me fully winterize yet. But with Thanksgiving being TOMORROW, its time I finally make the closet switch (I can't believe I haven't yet!) and look for ways to layer up like a Yeti while still looking reasonably human.
Also, all this talk of Black Friday makes me want to shop. But I refuse to shop at midnight amongst a throng of deal hungry shoppers that are more than willing to trample over me to get the last toaster on sale for 75% off. So I've been window shopping online...
I NEED BOOTS. Well, actually I don't. But I do. I'm not sure. If I was still commuting I would definitely have bought some boots but since I started working in Jersey, the walk from the house to car, car to office doesn't really warrant actual winter boots. And I can't decide which color. All this indecision keeps me from clicking the "checkout" button and it's been sitting in my cart for a week now. I did the same thing last year and never purchased....ahhhhh!!
Bright or Neutral?
Probably more my style (because I already own 100 pairs of these - I used to cut the sleeves off of long sleeved shirts and wear them as arm warmers). J.Crew calls them "glovettes":
Also, all this talk of Black Friday makes me want to shop. But I refuse to shop at midnight amongst a throng of deal hungry shoppers that are more than willing to trample over me to get the last toaster on sale for 75% off. So I've been window shopping online...
I NEED BOOTS. Well, actually I don't. But I do. I'm not sure. If I was still commuting I would definitely have bought some boots but since I started working in Jersey, the walk from the house to car, car to office doesn't really warrant actual winter boots. And I can't decide which color. All this indecision keeps me from clicking the "checkout" button and it's been sitting in my cart for a week now. I did the same thing last year and never purchased....ahhhhh!!
Bright or Neutral?
 |
| www.sorel.com |
 |
| www.sorel.com |
Aren't these cute? Only Marc Jacobs could update his now staple flat with shearling lining:
 |
| www.net-a.porter.com |
I'm starting to develop an affinty towards hats...
 |
| www.jcrew.com |
 |
| dangit, I can't remember where I saw this, but I think it's Rag & Bone |
Much girlier than I usually like but something appealing about a fur pom pom on your gloves:
 |
| www.piperlime.com |
 |
| www.jcrew.com |
And my winter LUST item which I will drool after, hunt down for sales, but most likely not purchase:
 |
| Front www.yigalazrouel.com |
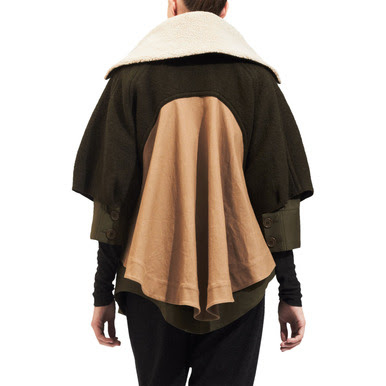 |
| Back |
You can even wear just the lining! How versatile!
 |
| Lining only www.yigalazrouel.com |
Tuesday, November 22, 2011
Royal Icing 101: A tutorial
Alrighty folks! Now we get to the fun part of cookies, the decorating! Every artist needs a medium: the sugar cookie is my canvas, and royal icing is my paint!


It's simple, versatile, and pretty forgiving. I've done a lot of research and you can find a gajillion receipes for royal icing --> they're pretty much all the same with minor tweaks. Like 1/4 tsp of almond extract as opposed to 1/2 tsp. Psssht. I give kudos for all the anal bakers who like to test batch after batch with minor tweaks to find the perfect recipe. Cuz if it weren't for you, who would I steal from? JK. I appreciate all your hard work.
I'm reminded of my college days....a fellow math major and I would do problem sets weeeee into the night. Obviously since we're doing it together, we would hand in the same solutions. But I always scored slightly higher than her. We think it was due to penmanship and neatness. Hers always had ramen and soup stains on her problem sets as she worked diligently while eating. Mine were neat and legible since I was waiting for her to finish so I could copy. Hee hee. I hope she's not reading this.
Anyways, back to cookies. Actually I did try a few and honestly I didn't taste any major differences. I think with royal icing its just about making sure to add enough flavoring otherwise you're basically eating sugar and water which isn't very flavorful (though it is very sweet and again I'm reminded of another gf who likes to eat Peeps, fondant and royal icing - without the cookie/cake - I have lots of weird friends). I used to describe my cookies as bimbo cookies - pretty to look at but perhaps not much substance. Hopefully that's not the case anymore and they're as good to eat as look at.
So let's start with the basic recipe. I add the suffix "101" because obviously this is just the beginning! We haven't even started on the decorating but need to start with the basics right?
I'm still learning new tricks and I'm trying (oh so hard) to document as much as I can with pictures. But sometimes the battery dies. Or I forget to take off the lens cap (omg, it's a horrible horrible feeling to open up a folder of black pictures). Or I'm already late to a birthday dinner and making my ride tie ribbons for me so I feel bad taking more time to take pictures. The list goes on. But this blog IS making me feel more accountable (<-- I had to look up the spelling of that word in the dictionary...!) so I'm being more diligent with the photo snapping. Except for this tutorial. I'll rememer to take the lens cap off next time. Anyways, this is not that hard but I will update again with photos.
Btw, I updated my cake pop tutorial with new photos for step 5A. See? I do get things done eventually.
ROYAL ICING
2 lbs (or 8 cups) of 10x confectioner's sugar
6 tablespoons of meringue powder, slightly heaping
1/2 cup warm water
1 - 2 tsps of flavoring/extract
Confectioner's sugar = powdered sugar. You can usually buy it in a 2 lb bag which makes it easy since you don't need to even measure it out, just dump the entire bag into the mixer.
Oh, did I mention - you need a mixer. I suppose you can use a hand mixer but that's a long time you'll be standing there. On the upside, I'm pretty sure you'll get diesel if you use a hand mixer. I have noticed that my arms are slightly more toned from rolling out cookie dough. I can only imagine how ripped I'd be if used a hand mixer as well.
By slightly heaping, I mean just eyeball it so it might be a little more than an actual tablespoon measurement. Because if you're a serious baker, you know that when recipes give measurements, you're supposed to be pretty exact - ie level off the top of the measuring spoon/cup with a flat edge to have it be concise. You've been doing that right?! But for this you don't need to.
My flavoring of choice is usually almond extract. For Christmas I was going to test peppermint. Yum! Make sure you use any flavoring that does NOT HAVE ANY OILS in it. Oil and water do not mix. Remember that old chemistry lesson? You can shake it all you want but they will eventually separate out. Regular vanilla, lemon or almond extract that you buy at the supermarket is ok. But note: you should try to buy clear extract made for icing decorating otherwise your icing will be slightly tinted from the color. If you're not making white icing I suppose its ok since you'll cover it up with food coloring. But if you're looking for a crips white, make sure you get clear flavors. They sell it at Michael's and Chef Central (my favorite is online at Lorann Oils but only if I'm buying a lot because paying for shipping is a pet peeve of mine).
Make sure your water is warm. I won't even go into temperature and solubility here...actually I can't resist - it's a direct relationship!
1. Throw sugar and meringue powder into mixing bowl. Turn on mixer.
2. Add flavoring to your warm water and then pour this slowly into your dry mixture
3. Mix on low to medium speed for 8 - 12 minutes.
That's it! In the beginning your icing will look a gooey and ivory in color. After about 8 minutes though you'll see it fluff up, lose its shine and turn bright white. If it looks a little TOO stiff (ie your mixer starts making noise or starts moving across the counter) then add a little bit more water, a teaspoon at a time. When you lift the icing up, it should stay up in a peak (and not fall back in) - it's that stiff. This is your base icing.
The recipe makes a pretty large batch. Should be able to ice about 4 dozen cookies. You can portion it up into tupperware and put in the fridge. Remember to add a layer of saran wrap touching the icing so that it doesn't dry out.
I believe it keeps in the fridge for up to a month? Never had it last that long. You can even just throw in the whole mixing bowl into the fridge if you're too lazy to transfer it into tupperware but cover it with a WET paper towel on top and then cover with saran wrap or even a plate. The key is not to let it dry out. Once it does, you gotta chuck it. Although, I've recently been seeing blogs on where they salvage dry icing with a spray bottle. I'll report back once I confirm it works...
So there's your icing.
I'm pretty sure you'll want to dive right into decorating but hopefully I'm not your only cookie resource right now because...I'm tired. Writing coherent thoughts drains me. So decorating will have to be covered in RI 102. Until next time.... (please cover your icing so it doesn't dry out until the next post...)


It's simple, versatile, and pretty forgiving. I've done a lot of research and you can find a gajillion receipes for royal icing --> they're pretty much all the same with minor tweaks. Like 1/4 tsp of almond extract as opposed to 1/2 tsp. Psssht. I give kudos for all the anal bakers who like to test batch after batch with minor tweaks to find the perfect recipe. Cuz if it weren't for you, who would I steal from? JK. I appreciate all your hard work.
I'm reminded of my college days....a fellow math major and I would do problem sets weeeee into the night. Obviously since we're doing it together, we would hand in the same solutions. But I always scored slightly higher than her. We think it was due to penmanship and neatness. Hers always had ramen and soup stains on her problem sets as she worked diligently while eating. Mine were neat and legible since I was waiting for her to finish so I could copy. Hee hee. I hope she's not reading this.
Anyways, back to cookies. Actually I did try a few and honestly I didn't taste any major differences. I think with royal icing its just about making sure to add enough flavoring otherwise you're basically eating sugar and water which isn't very flavorful (though it is very sweet and again I'm reminded of another gf who likes to eat Peeps, fondant and royal icing - without the cookie/cake - I have lots of weird friends). I used to describe my cookies as bimbo cookies - pretty to look at but perhaps not much substance. Hopefully that's not the case anymore and they're as good to eat as look at.
So let's start with the basic recipe. I add the suffix "101" because obviously this is just the beginning! We haven't even started on the decorating but need to start with the basics right?
I'm still learning new tricks and I'm trying (oh so hard) to document as much as I can with pictures. But sometimes the battery dies. Or I forget to take off the lens cap (omg, it's a horrible horrible feeling to open up a folder of black pictures). Or I'm already late to a birthday dinner and making my ride tie ribbons for me so I feel bad taking more time to take pictures. The list goes on. But this blog IS making me feel more accountable (<-- I had to look up the spelling of that word in the dictionary...!) so I'm being more diligent with the photo snapping. Except for this tutorial. I'll rememer to take the lens cap off next time. Anyways, this is not that hard but I will update again with photos.
Btw, I updated my cake pop tutorial with new photos for step 5A. See? I do get things done eventually.
ROYAL ICING
2 lbs (or 8 cups) of 10x confectioner's sugar
6 tablespoons of meringue powder, slightly heaping
1/2 cup warm water
1 - 2 tsps of flavoring/extract
Confectioner's sugar = powdered sugar. You can usually buy it in a 2 lb bag which makes it easy since you don't need to even measure it out, just dump the entire bag into the mixer.
Oh, did I mention - you need a mixer. I suppose you can use a hand mixer but that's a long time you'll be standing there. On the upside, I'm pretty sure you'll get diesel if you use a hand mixer. I have noticed that my arms are slightly more toned from rolling out cookie dough. I can only imagine how ripped I'd be if used a hand mixer as well.
By slightly heaping, I mean just eyeball it so it might be a little more than an actual tablespoon measurement. Because if you're a serious baker, you know that when recipes give measurements, you're supposed to be pretty exact - ie level off the top of the measuring spoon/cup with a flat edge to have it be concise. You've been doing that right?! But for this you don't need to.
My flavoring of choice is usually almond extract. For Christmas I was going to test peppermint. Yum! Make sure you use any flavoring that does NOT HAVE ANY OILS in it. Oil and water do not mix. Remember that old chemistry lesson? You can shake it all you want but they will eventually separate out. Regular vanilla, lemon or almond extract that you buy at the supermarket is ok. But note: you should try to buy clear extract made for icing decorating otherwise your icing will be slightly tinted from the color. If you're not making white icing I suppose its ok since you'll cover it up with food coloring. But if you're looking for a crips white, make sure you get clear flavors. They sell it at Michael's and Chef Central (my favorite is online at Lorann Oils but only if I'm buying a lot because paying for shipping is a pet peeve of mine).
Make sure your water is warm. I won't even go into temperature and solubility here...actually I can't resist - it's a direct relationship!
1. Throw sugar and meringue powder into mixing bowl. Turn on mixer.
2. Add flavoring to your warm water and then pour this slowly into your dry mixture
3. Mix on low to medium speed for 8 - 12 minutes.
That's it! In the beginning your icing will look a gooey and ivory in color. After about 8 minutes though you'll see it fluff up, lose its shine and turn bright white. If it looks a little TOO stiff (ie your mixer starts making noise or starts moving across the counter) then add a little bit more water, a teaspoon at a time. When you lift the icing up, it should stay up in a peak (and not fall back in) - it's that stiff. This is your base icing.
 |
| After ~2 minute: icing is a pale ivory in color and gooey looking |
 |
| After ~4 minutes: icing is starting to thick |
 |
| After ~6 minutes: Icing becomes noticeably whiter, thickening and growing in volume. (I noticed the switch from the ivory paste to white frosting somewhere between minute 4 and 5 but don't hold fast to these time markers) |
 |
| After ~8 minutes: Icing continues to whiten/thicken/increase in volume. |
 |
| Done! When you lift the beater up, the icing stays on the beater. This is just your base icing. From this point you will have to add water to achieve the consistency you want/need for icing. I like to store icing at this consistency if I am not going to use it imeediately since the water tends to separate over time but I've never seen it happen at this level. |
The recipe makes a pretty large batch. Should be able to ice about 4 dozen cookies. You can portion it up into tupperware and put in the fridge. Remember to add a layer of saran wrap touching the icing so that it doesn't dry out.
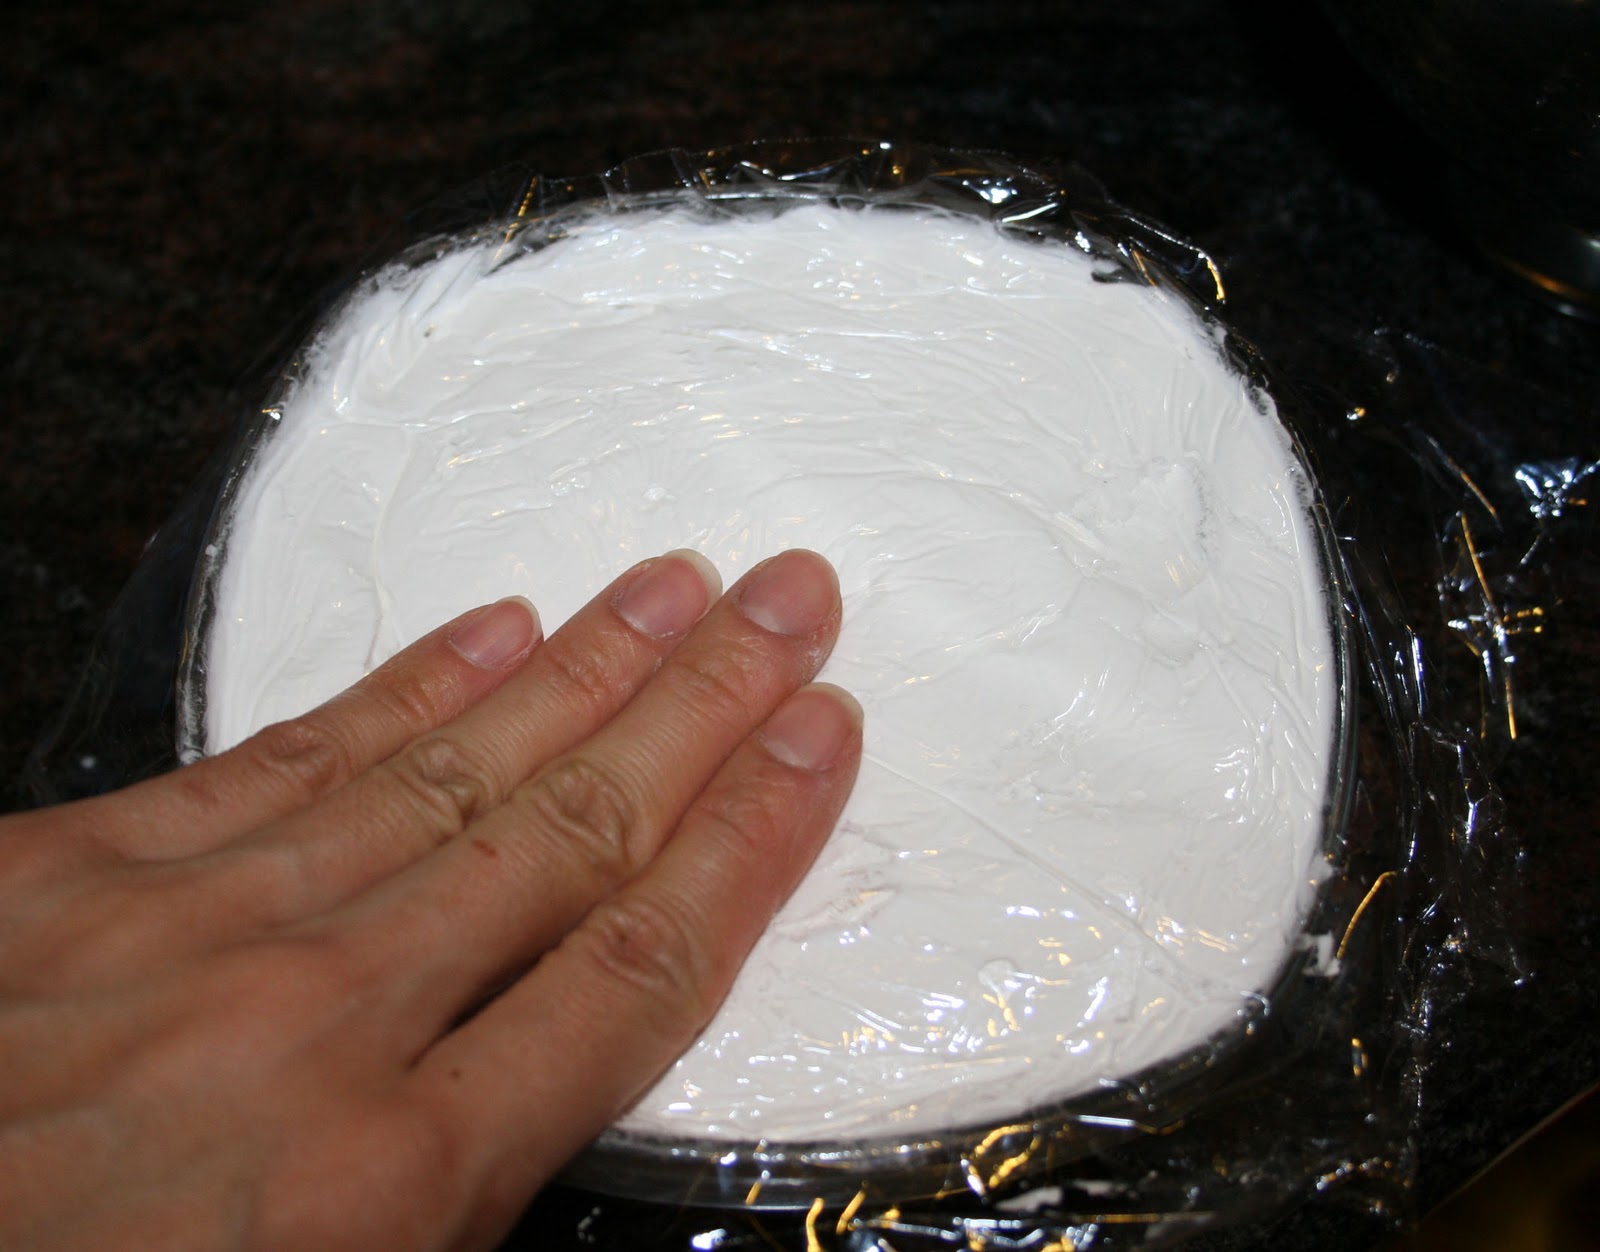 |
| Cover the icing with a layer of saran wrap before covering with the lid. Press down on the saran wrap so that its touching the icing (so air can't get in and dry it out) |
 |
| Not enough icing to completely fill the tupperware? No problem. Just make sure you push down on the saran wrap layer so its making full contact with the surface of the icing |
 |
| Add caption |
 |
| Packed and ready for storage! |
So there's your icing.
I'm pretty sure you'll want to dive right into decorating but hopefully I'm not your only cookie resource right now because...I'm tired. Writing coherent thoughts drains me. So decorating will have to be covered in RI 102. Until next time.... (please cover your icing so it doesn't dry out until the next post...)
Subscribe to:
Posts (Atom)